gws
Member
Posts: 969
Location: NW New Mexico
|
Post by gws on Jun 16, 2014 15:07:26 GMT -5
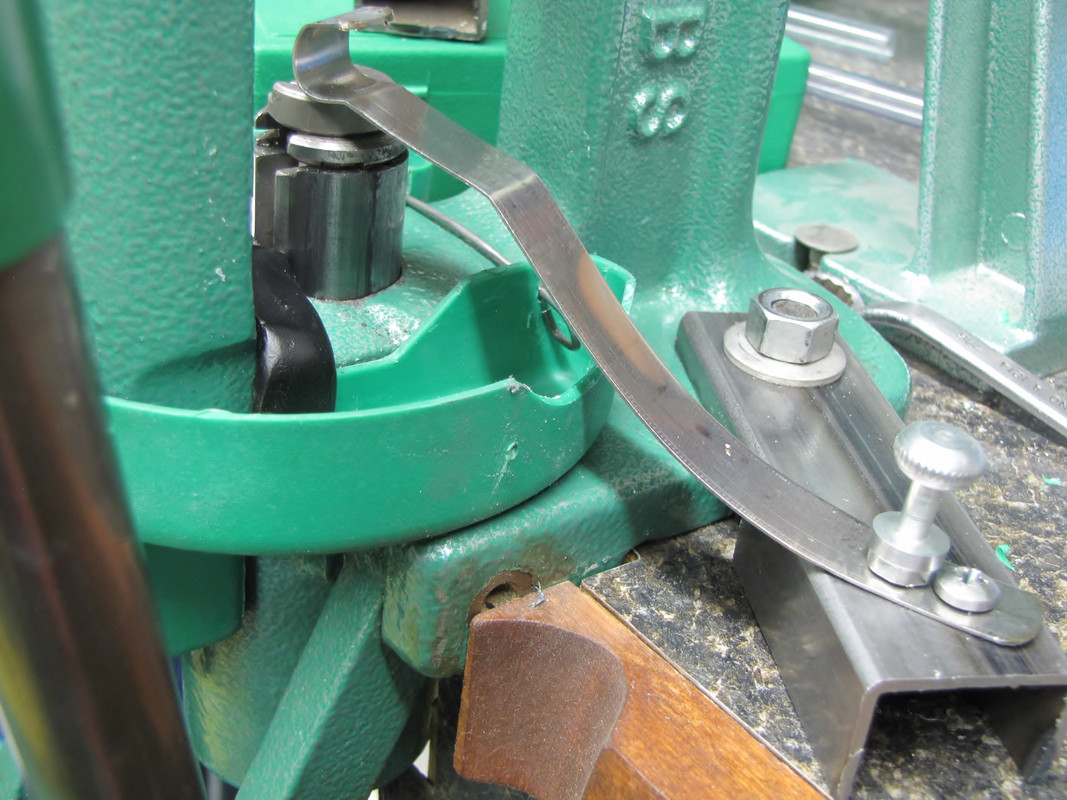
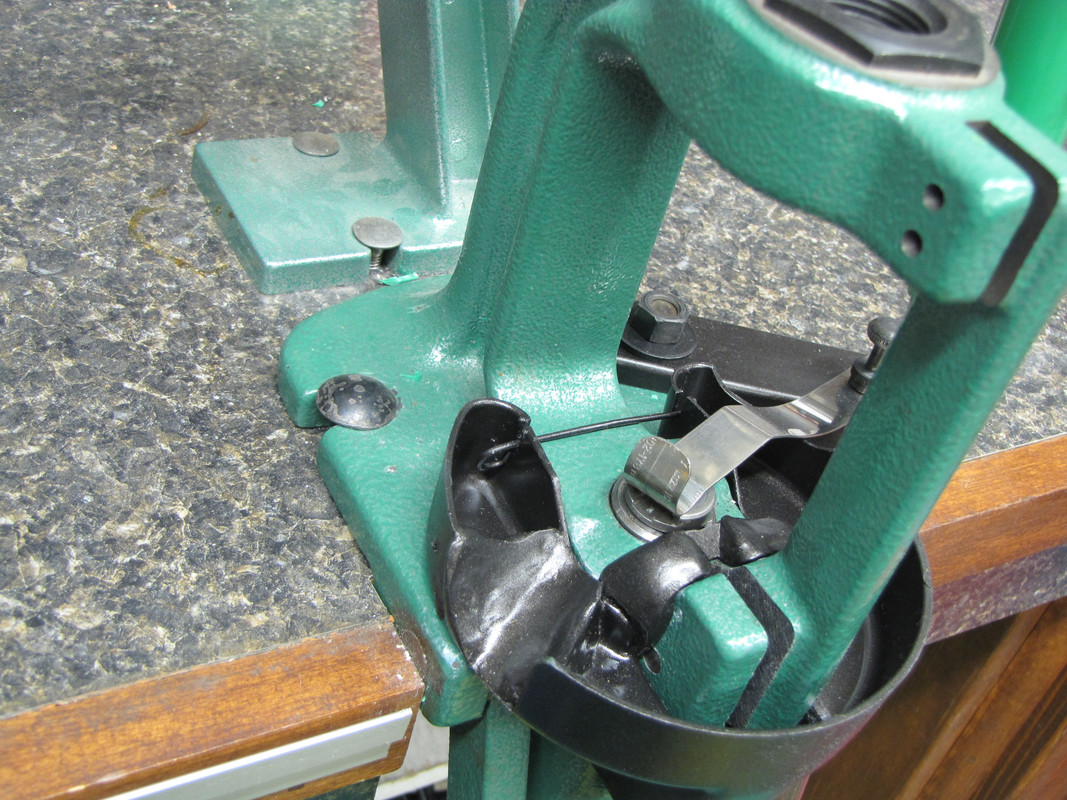
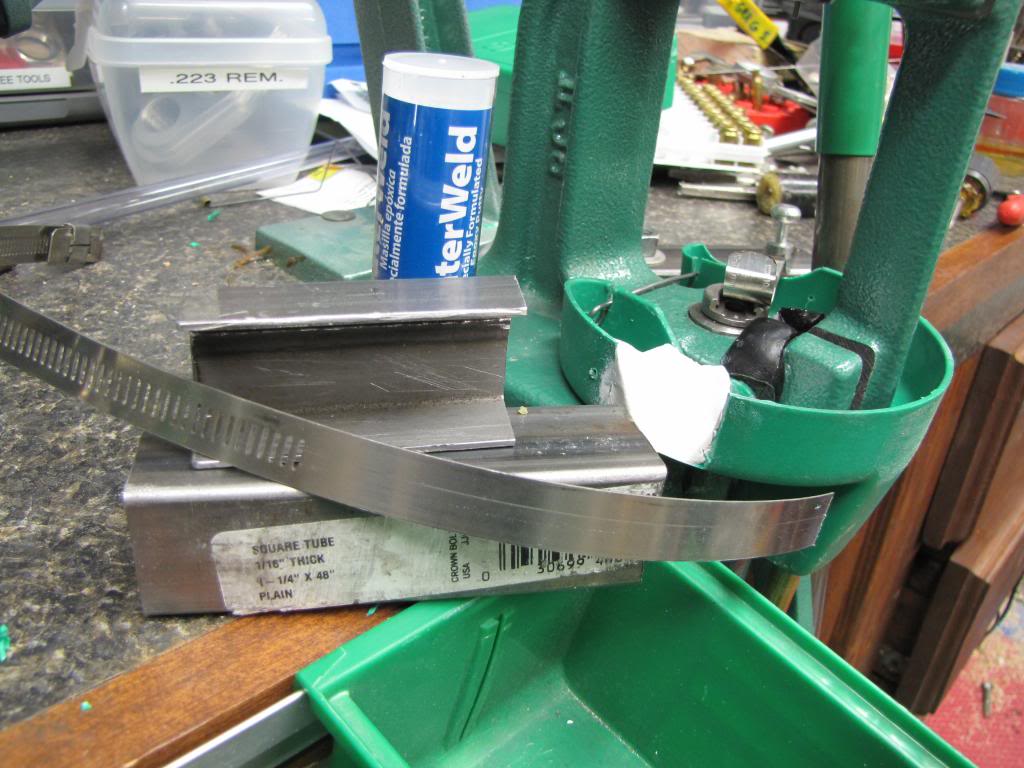
A simply-built yet effective case Kicker on a Rock Chucker II. (No extra holes in your bench!)   Thumb screw is removed to allow the spring to pivot out of the way when not used. Epoxy Putty from Home Depot makes the ramp below.....  Here's the only materials....large hose clamp....steel square tubing.....misc. hardware. (Black epoxy is part of a spent primer catcher project....coming.  |
|
|
|
Post by hacker54 on Jun 16, 2014 15:20:49 GMT -5
gws,
Nice. How are you posting pics of this size. Are you compressing them and if so I sure would like to know how to do it properly.
|
|
gws
Member
Posts: 969
Location: NW New Mexico
|
Post by gws on Jun 16, 2014 15:41:29 GMT -5
"Postimage" link is what I use now... I upload all my pictures there. Once you have an album you can edit pictures there and make them any size you want. But unless I have a special need I don't. What you see is what is default on Postimage. To upload a picture from there to here just hover on a picture, click the "share" icon and copy the direct link to the clipboard. Then just go to the post you are editing here, (make sure you are in reply not quick reply) and click the "insert picture" icon. Then control-V (paste) the link in your clipboard to the highlighted entry spot and click "insert image" That's it....it goes to where ever your flashing pointer is at 100 percent picture size.
If you go to the "BBCode" tab at the bottom of the "Edit Post" screen here on "2 A Munitions" you can edit that. For example:
surrounded by [] (brackets)
is the code in BBCode for one of the pictures above. If I change the BBCode where is says "max-width:100%; to 50% it will post at half size....see below:  |
|
|
|
Post by hacker54 on Jun 16, 2014 15:52:48 GMT -5
Thank you I'll have to look into this again thanks.
|
|
gws
Member
Posts: 969
Location: NW New Mexico
|
Post by gws on Jun 16, 2014 16:25:47 GMT -5
I erased the original post in this spot because it isn't relevant anymore since PhotoBucket became the enemy. Absolutely nothing was here  |
|
|
|
Post by Admin on Jun 16, 2014 16:47:32 GMT -5
There is another way. When you click Reply (not quick reply) the window that opens has a button to add attachment. This will allow you to upload a picture from your PC. It must be no larger than 1mb. The problem is we have very limited monthly space. It will allow us to upload roughly 200 1MB pictures a month. That may prove to be plenty and more space can be purchased. The other problem is the picture below is at the largest allow using the attachment option but you can click on the picture and it will load the full size version The photobucket method that GWS has described is a far better way to accomplish adding pictures.  |
|
gws
Member
Posts: 969
Location: NW New Mexico
|
Post by gws on Jun 16, 2014 16:57:04 GMT -5
So how big are my pictures? If yours is 1 mb then it will be of no use for How-to posts because you can't see any detail. If I need to I will downsize the pictures I posted or eliminated them and just provide a link to them to Post Image. Let me know...not my intention to hog bandwidth. My compliments on your Pro Boards software!.......and your avatar!  Sorry I answered before you finished your post. Clicking on the thumbnail is certainly adequate for all but picture essays like the one I posted. Sorry I answered before you finished your post. Clicking on the thumbnail is certainly adequate for all but picture essays like the one I posted.
|
|
|
|
Post by Admin on Jun 16, 2014 17:20:38 GMT -5
gws,
I have looked and so far I can't see where your method is using up our bandwidth. I maybe wrong but it haven't found them in the control panel statistics.
|
|
dangun
Member
I love the smell of burnt gun powder.
Posts: 517
Location: SW Florida
|
Post by dangun on Jun 18, 2014 7:28:05 GMT -5
GWS,
BTW the case kicker is a good idea and appears to be a simple and useful addition to any press. Thanks!
|
|
gws
Member
Posts: 969
Location: NW New Mexico
|
Post by gws on Jun 18, 2014 20:59:37 GMT -5
Dan, I decided one would be worthwhile when I bought a Thumlers for wet tumbling.....using a universal primer puncher (another tool I never thought I'd need) needed a speed enhancer. Thought I had a video.....but I can't find it. Nuts!
|
|
dangun
Member
I love the smell of burnt gun powder.
Posts: 517
Location: SW Florida
|
Post by dangun on Jun 19, 2014 9:57:26 GMT -5
The universal de-capers are the way to go in my opinion. I don't like to run dirty brass into my dies. I never had a wet tumbler and probably won't now that I'm going on the road. Well maybe not but I am going to make a kicker for my press.
|
|
|
|
Post by springfieldxdm on Jun 28, 2014 12:19:42 GMT -5
  I I too used the hose clamp method for the homemade case kicker and it's awesome. For the newer version of the primer catcher I made a slide out of a piece of vacuum forming plastic similar to the "rapid case kicker" videos on youtube. $.40 cents a sheet and some time with a heat gun and it's amazing what you can do. I also made a no touch spent primer system utilizing the stock y type primer catcher on the rock chucker IV supreme. By removing the base bucket and cutting off the base and neck of an old .223 case. This is then glued with a little super glue and a clear tubing about 3 ft long is attached to the end of the case with a zip tie and then routed to a old powder canister. An old ear plug provides proper tension behind the neck of the catcher keeping proper tension on the ram. I too use a Wendy's straw in the ram. When depriming large batches of brass before wet tumbling only 2 or 3 spent primers miss the catch bin now. Before I was lucky to get 2 or 3 in the buckets per hundred. I have tons of pics but no photobucket account. If anybody wants some detailed close up shots let me know and I can email or text them to you. All this sounds difficult but is really simple to do |
|
|
|
Post by springfieldxdm on Jul 2, 2014 18:23:10 GMT -5
  Only because I'm anal I had to use a sharpie to color the earplug that keeps the primer catcher tensioned on the ram. The other picture shows the chute I made out of vacuum forming plastic with the heat gun. More pics to come |
|
|
|
Post by springfieldxdm on Jul 2, 2014 18:27:53 GMT -5
This is the pictures of the no touch spent primer set up, the bottom of the cut off .223 case is seen connected to the tubing. Even though I used super glue to hold it together I figured I'd put a few zip ties on it also. I can't take credit for any of these mods, just browsing the internet for ideas and connected a few together. It works well for me and I hope it helps some of you.   |
|