Post by krwada on Jul 28, 2014 0:46:59 GMT -5
This process is pretty close to a TYPE III hard anodized aluminum. It will get you at least a 0.001" very nice hard coat of aluminum oxide surface on any piece of aluminum. It takes awhile, but the results are very well worth the time and effort.
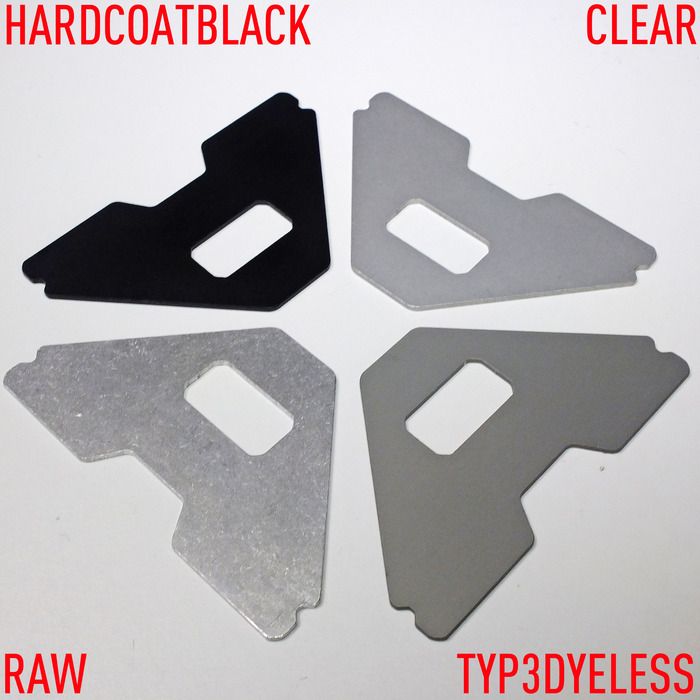
Personally, I like the look of the clear anodizing. However, you can use a dye during the sealing process to pretty much get any color you want. I have heard that the RIT dye works OK ... However, I do believe that there are better alternatives to RIT for the dye.
What you will need:
1. Household ammonia, (desmut the aluminum)
2. Acetone, (degreaser)
3. 750 ml battery acid
4. 3lb ice
5. 2 cups of water
6. 3 ampere 18 volt constant voltage constant current power supply
7. 3 gallon PLASTIC bucket
8. 1 gallon PLASTIC bucket
9. plastic paddle, (I used a 12" plastic ruler)
10. Scotch brite pad
11. 2loaf capacity aluminum pan, (get the cheap disposable one at the grocery store)
12. Aluminum foil
13. Latex or nitrile gloves, (you must wear this for safety reasons)
14. Eyewear, or face shield, (again, safety)
15. A very well ventilated area. You really ought to do this outside in your back yard.
16. Aluminum wire
17. Baking soda and Washing soda
Procedure:
prep
1. Finish sand all the aluminum with up to 600 grit sandpaper. All scratches will be enhanced by this process
2. Finish all surfaces with the scotch brite pad
3. Degrease the aluminum using acetone and let completely dry
4. Place the aluminum in the 2loaf pan and pour the ammonia to cover the aluminum
5. Let sit for at least 20 minutes. Bubbles will form. This is the ammonia partially dissolving impurities like Copper and Magnesium
6. With gloves on, scrub the aluminum using scotch brite pad under the ammonia solution
7. Drain the ammonia and continue scrubbing using the scotch brite pad under running water.
8. Your aluminum is now prepped and ready to go into the tank.
Anodizing setup
1. Your 1 gallon plastic bucket is your safety bucket. Pour 1/2 a small box baking soda in it and fill with tap water and mix well. Place your stirrer in this bucket.
2. Your 3 gallon plastic bucket is your anodizing bucket. Line one side with the aluminum foil all the way to the bottom
3. Securely connect the aluminum wire to your aluminum piece using pliers
4. Place the aluminum piece on the opposite side, away from the aluminum foil.
5. Connect the negative, (black) lead of the power supply to the aluminum foil.
6. Connect the positive, (red) lead of the power supply to the aluminum wire.
7. Do the following IN ORDER!!!
8. Fill the bucket with 3lb of ice
9. Pour the battery acid in the ice with aluminum
10. Carefully pour 2 cups of water into the anodizing bucket.
11. Neutralize the battery acid container with solution from your safety bucket till it stops fizzing. (squeeze the acid bottle, and pull the baking soda solution into the container several times until it stops fizzing. Add more baking soda to your safety bucket when necessary.
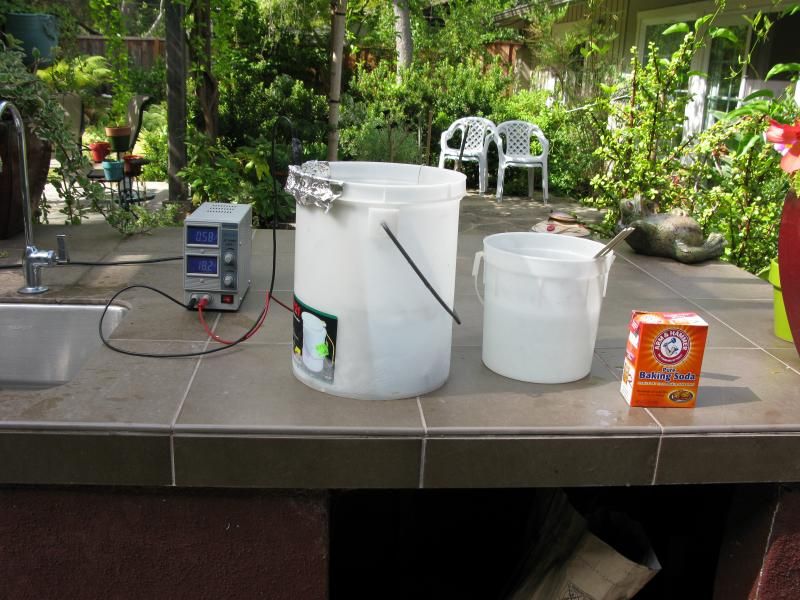
12. Now ... you should have a setup that looks like this:

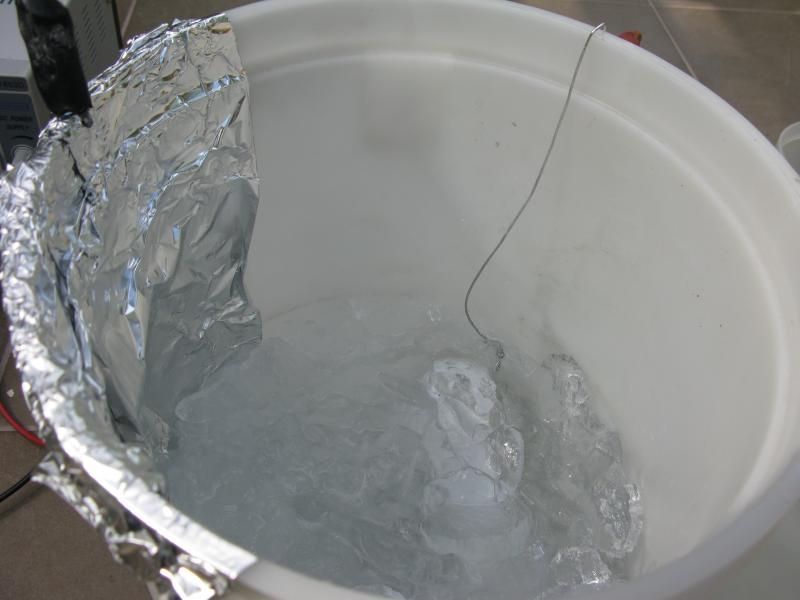
13. The anodizing bucket should look like this:

14. Stir the ice solution gently and carefully with your plastic paddle. After using the paddle ALWAYS place it in the safety bucket.
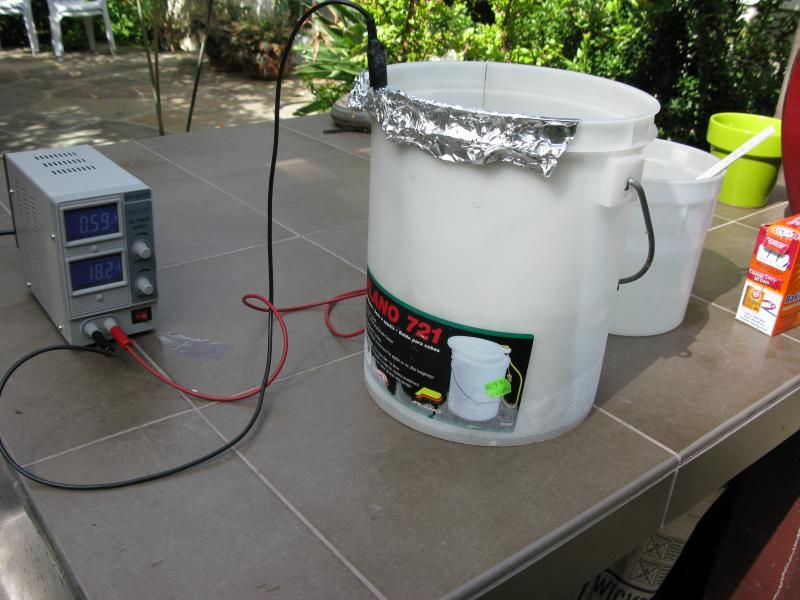
15. Here is what the process looks like when you start anodizing. Notice that the current reads about 0.6 amperes. This is OK, it will go up to 3 amperes in about an hour.

16. Let this thing run until the current goes down to zero.
Post process:
1. Turn off the power supply when the current goes down to zero.
2. Carefully lift the aluminum wire with the aluminum, and let the acid drip into the anodizing tank.
3. Place the aluminum and wire into the safety bucket and neutralize
4. The aluminum is now anodized, neutralized and is safe to handle
5. Carefully neutralize the acid bath using the washing soda. DO NOT GET NEAR THE FIZZING SOLUTION. POUR ONLY LITTLE BITS AT A TIME ... IN RETROSPECT ... I THINK 1st NEUTRALIZING USING LYE IS PROBABLY SAFER.
6. To test the neutralization, place a little bit, (1 teaspoon) of baking soda into the acid tank. If it does not fizz, it is neutralized.
7. Pour more baking soda into the neutralized tank and stir with the plastic paddle and let settle. If you see the baking soda collect on the bottom, the tank is now neutralized.
8. You can now dispose of the neutralized solution. It is nothing more than some aluminum along with a sodium sulfate salt, which is very benign.
Sealing:
1. Place the finished aluminum piece into the 2loaf pan
2. Fill with tap water until the aluminum piece is covered
3. Boil the aluminum piece for at least 30 minutes, (gentle boil)'
4. Carefully turn off the burner and drain into the sink
5. Place the finished aluminum piece on a paper towel to dry
Now you have successfully hard anodized a piece of aluminum.
Personally, I like the look of the clear anodizing. However, you can use a dye during the sealing process to pretty much get any color you want. I have heard that the RIT dye works OK ... However, I do believe that there are better alternatives to RIT for the dye.
What you will need:
1. Household ammonia, (desmut the aluminum)
2. Acetone, (degreaser)
3. 750 ml battery acid
4. 3lb ice
5. 2 cups of water
6. 3 ampere 18 volt constant voltage constant current power supply
7. 3 gallon PLASTIC bucket
8. 1 gallon PLASTIC bucket
9. plastic paddle, (I used a 12" plastic ruler)
10. Scotch brite pad
11. 2loaf capacity aluminum pan, (get the cheap disposable one at the grocery store)
12. Aluminum foil
13. Latex or nitrile gloves, (you must wear this for safety reasons)
14. Eyewear, or face shield, (again, safety)
15. A very well ventilated area. You really ought to do this outside in your back yard.
16. Aluminum wire
17. Baking soda and Washing soda
Procedure:
prep
1. Finish sand all the aluminum with up to 600 grit sandpaper. All scratches will be enhanced by this process
2. Finish all surfaces with the scotch brite pad
3. Degrease the aluminum using acetone and let completely dry
4. Place the aluminum in the 2loaf pan and pour the ammonia to cover the aluminum
5. Let sit for at least 20 minutes. Bubbles will form. This is the ammonia partially dissolving impurities like Copper and Magnesium
6. With gloves on, scrub the aluminum using scotch brite pad under the ammonia solution
7. Drain the ammonia and continue scrubbing using the scotch brite pad under running water.
8. Your aluminum is now prepped and ready to go into the tank.
Anodizing setup
1. Your 1 gallon plastic bucket is your safety bucket. Pour 1/2 a small box baking soda in it and fill with tap water and mix well. Place your stirrer in this bucket.
2. Your 3 gallon plastic bucket is your anodizing bucket. Line one side with the aluminum foil all the way to the bottom
3. Securely connect the aluminum wire to your aluminum piece using pliers
4. Place the aluminum piece on the opposite side, away from the aluminum foil.
5. Connect the negative, (black) lead of the power supply to the aluminum foil.
6. Connect the positive, (red) lead of the power supply to the aluminum wire.
7. Do the following IN ORDER!!!
8. Fill the bucket with 3lb of ice
9. Pour the battery acid in the ice with aluminum
10. Carefully pour 2 cups of water into the anodizing bucket.
11. Neutralize the battery acid container with solution from your safety bucket till it stops fizzing. (squeeze the acid bottle, and pull the baking soda solution into the container several times until it stops fizzing. Add more baking soda to your safety bucket when necessary.
12. Now ... you should have a setup that looks like this:

13. The anodizing bucket should look like this:

14. Stir the ice solution gently and carefully with your plastic paddle. After using the paddle ALWAYS place it in the safety bucket.
15. Here is what the process looks like when you start anodizing. Notice that the current reads about 0.6 amperes. This is OK, it will go up to 3 amperes in about an hour.

16. Let this thing run until the current goes down to zero.
Post process:
1. Turn off the power supply when the current goes down to zero.
2. Carefully lift the aluminum wire with the aluminum, and let the acid drip into the anodizing tank.
3. Place the aluminum and wire into the safety bucket and neutralize
4. The aluminum is now anodized, neutralized and is safe to handle
5. Carefully neutralize the acid bath using the washing soda. DO NOT GET NEAR THE FIZZING SOLUTION. POUR ONLY LITTLE BITS AT A TIME ... IN RETROSPECT ... I THINK 1st NEUTRALIZING USING LYE IS PROBABLY SAFER.
6. To test the neutralization, place a little bit, (1 teaspoon) of baking soda into the acid tank. If it does not fizz, it is neutralized.
7. Pour more baking soda into the neutralized tank and stir with the plastic paddle and let settle. If you see the baking soda collect on the bottom, the tank is now neutralized.
8. You can now dispose of the neutralized solution. It is nothing more than some aluminum along with a sodium sulfate salt, which is very benign.
Sealing:
1. Place the finished aluminum piece into the 2loaf pan
2. Fill with tap water until the aluminum piece is covered
3. Boil the aluminum piece for at least 30 minutes, (gentle boil)'
4. Carefully turn off the burner and drain into the sink
5. Place the finished aluminum piece on a paper towel to dry
Now you have successfully hard anodized a piece of aluminum.


 My daughter came from Missouri, my son and grand son, my wife and I had a nice dinner of grilled "porter house" pork chops, corn on the cobb, my son, G'son and I share 10/5. G'son is 4 minutes early though @ 10/4.


 Pooh I hope you find to right house .


