|
|
Post by krwada on Jun 16, 2014 17:30:58 GMT -5
To tell you the truth ... I have not reloaded very much lately. I have been very busy working with my new mill.
Currently, I am making a full custom 1022. I am also finishing the receiver from a blank too. I suppose this makes it a full custom rig. It will have the following in it:
1. RAZOR-1022 blank receiver, modified
2. Volquartsen carbon fiber barrel with a compensator
3. Kidd two-stage match trigger
4. Kidd bolt and charging handle
5. Custom machined skeletonized stock starting with an Axiomm charger
6. Burris quick detach PEPR 30mm mount
7. Millet designated marksman optics with circle-dot reticle and 1-4x zoom
8. Picatinny front accessory rail
9. Forward pistol grip
10. Magpul multi-mission sling.
I am getting very close to completing this thing. I will post pictures after zeroing it at the range.
|
|
dangun
Member
I love the smell of burnt gun powder.
Posts: 517
Location: SW Florida
|
Post by dangun on Jun 16, 2014 20:03:24 GMT -5
Ken,
Why wait to zero? We can't tell it isn't zero'd in the picture. LOL It sounds awesome...I wanna see!
|
|
|
|
Post by krwada on Jun 17, 2014 11:23:21 GMT -5
Ken, Why wait to zero? We can't tell it isn't zero'd in the picture. LOL It sounds awesome...I wanna see! You know what Dan? I was thinking about this last night. I think I will do a small photo-essay on this project ... especially for this forum. It will take a few days, but I think it should stir up some interest. This is my very 1st build. I can say this much for certain: Anyone who says a custom build can be done for cheaper: 1. Has never done such a thing. 2. Maybe full of shit 3. Does not know what they are talking about. The custom build ... of anything ... will cost more. However ... You get exactly what you want... (well somewhat ... I did make a few mistakes along the way) ... and in the process you learn a whole lot too! I have absolutely learned a ton about firearms by building this thing. I can very easily see how you cannot just do one of these things! As I learn from the current one ... I am already starting to think about what I would do differently to get a better build the next time around! The funny thing about all of this is ... my wife sees how truly happy I am when I am in the garage machining stuff. Just the other day, she looked at the parts I was making up, and asked me if there was an FFL that I could get for doing this for resale. I told her that what she is talking about is a type-07 FFL. She then said I maybe should start looking into getting one of these. Wow! |
|
dangun
Member
I love the smell of burnt gun powder.
Posts: 517
Location: SW Florida
|
Post by dangun on Jun 18, 2014 5:48:33 GMT -5
Ken,
I laugh smiley-laughing021everytime I hear someone say they can build it cheaper. I had a friend that wanted to build a cedar chest because he knew he could do it cheaper. So he start the project. Several thousand dollars later, after buying a table saw, router table, and various other shop tools he completed the cedar chest. I think he spent close to $6000.00 getting it done. He did go on to build several other very nice small pieces of furniture, but of course with every new project came the need for another wigget.
Much like reloading, there is always a nicer press, scale, powder throw, die set, wet tumbler, ultra sonic cleaner, brass prep station, neck turner and any number of other wiz gizzies that we have to have all in the name of saving money.
|
|
7mmmountaineer
Member
Time to face it I am a workaholic............
Posts: 521 
|
Post by 7mmmountaineer on Jun 18, 2014 7:27:29 GMT -5
That's funny Dan I know a few of those folks too. Outside of a 3 wheeled spindle shaper (fancy raised panel cutting machine) to can build almost anything wood or furniture related with just a few tools. I once and if things slow down will get back into my wood working hobby too. My loading room I am getting started on July 1 I will have 10 days to work on it shit a working vacation. If I get the time I will convert my plans over to a PDF and post them of course like all projects they are subject to change lol.....
|
|
dangun
Member
I love the smell of burnt gun powder.
Posts: 517
Location: SW Florida
|
Post by dangun on Jun 18, 2014 7:36:07 GMT -5
Chuck,
I know what you mean. I have been working on the RV adding upgrades, replacing worn parts or parts on the roof that have become brittle due to UV. While also trying to get a simple setup for reloading for when we go off grid. Well mostly off grid.
The next big project will be add solar power to the RV. If we were staying put I would add solar to the reloading/ham shack.
|
|
dangun
Member
I love the smell of burnt gun powder.
Posts: 517
Location: SW Florida
|
Post by dangun on Jun 18, 2014 13:41:06 GMT -5
Ken the photo essay would be awesome. I hope you find the time to do it. I know I would be interested in reading it.
|
|
|
|
Post by krwada on Jun 18, 2014 16:25:15 GMT -5
Ken the photo essay would be awesome. I hope you find the time to do it. I know I would be interested in reading it. I am going to take some pictures later this evening. Hopefully ... I will get the thing posted in the next few days or so. |
|
|
|
Post by krwada on Jun 18, 2014 23:49:35 GMT -5
OK ... Here is a brief photo-essay of the full-custom 1022 build I am currently working on. This is my 1st build ... of anything firearm. I decided to do a .22LR because I wanted to have as many 'evil' features that I can place on a gun here in the Peoples Republic of California. Also; I figured that If I messed up ... well ... it is a .22LR no? As many of you here know, I decided to go out and purchase a small mill last year. I have been working on fitting this thing for a few months now. I finally got the thing fitted to the point where I was confident on doing the project. In addition to the mill; I decided that I would go out and do the build based on the following: 1. RAZOR 1022 blank2. Blackhawk Axiom R/F Ruger 22 Charger Stock ... (with modifications of course)3. Volquartsen THM carbon fiber barrel ... (Scott Volquartsen is 1st rate!)4. Volquartsen Forward blow compensator ... (looks cool + supposed to enhance accuracy)5. Kidd 2-stage 10-22 trigger ... (I really like 2-stage triggers)6. Kidd 10-22 bolt assembly ... (This thing is already worked up, radiused, pinned and headspaced)7. Kidd 10-22 Cocking assembly with oversized charging handle, (easy to grip)8. Uncut Blank Rifle Picatinny Rail Mount, (used as an accessory rail)9. 16mm carbon fiber tube boom for Tarot Fy680 Fy650 Quadcoipter Hexacopter Frame, (needed cheap carbon fiber tube)10. Mako tactical foregrip, (I like the ability to change this into different shooting positions)11. Other odds and ends, (takedown screws, receiver pin, bolt buffer and V-block)12. Burris AR-P.E.P.R QD mount, (quick disconnect 30mm mount, I usually spend a bit more on mounts than optics)13. Millet Bk81002 DMS Rifle Scope, (I really like the illuminated Gewehr style reticle, plus this is a decent $200 optic)14. Miles Gilbert Glass Bedding Kit. (Used to secure the receiver and adaptor into the modified stock)15. Pachmayr Grind-to-Fit Decelerator Pad, (I need a secure grip to my shoulder for maximum holding power and accuracy when running around!)So ... I decided that some of the features I wanted were as follows: 1. Accurate 2. Very light weight 3. Ability to change from single-point sling to two-point sling easily 4. Quick target acquisition 5. Ability to take off-hand shots up to 100 yards. 6. Look cool ... like an MP5 7. Fun to shoot! So ... at the top of my list is accuracy. One of the problems with the custom Ruger 1022 is only a single attachment point for the forward takedown screw. Unless you do an extreme job of bedding the receiver ... the entire assembly has only a single point of attachment ... thus a tendency to wobble. What I really wanted was the ability to add a takedown at the rear of the receiver ... just like you would see in a bolt action rifle ... What to do? In addition to this; I wanted a pistol grip for the thing. Originally, I was thinking about machining the entire stock assembly and laying up carbon fiber to make a full custom stock. I started drawing up some plans. As I was doing this ... it came to me that this was going to be a HUGE amount of work. Not that I did not know how to do this. I know how to properly layup carbon fiber and fiberglass because of all the years of doing that High Power Rocketry. Resins, epoxy and composites are no stranger to me. However ... ALL THAT WORK! So ... being the engineer that I am ... I decided to see if there was any way I could do a shortcut. That is ... is there a way I can buy a composite stock off the shelf and modify it. After all ... there is a very thriving AR industry out there no? There is another problem that I needed to solve. I do NOT want to clean this thing through the muzzle end of the bore. Spend all this money, time and effort ... only to potentially ruin the crown? So, I decided to machine an access hole at the rear of the receiver. This will allow me to stick the cleaning rod through the back and into the breech. This is the proper way to clean the thing. I decided that I did not want to use a bore snake like a lot of my friends use with their auto-loaders. So ... in a nutshell, here are the problems I was confronted with. 1. Need pistol grip 2. Need a 'badass' carbine style rifle 3. Need breech access hole in receiver 4. Need rear takedown pin for improved receiver mounting and enhanced accuracy The rear breech access hole in the receiver is a no-brainer ... You just machine one in! I did just this to fit a 0.300" carbon fiber tube as a cleaning guide rod. Now ... on to the other problems. Well ... it turns out that all of the problems can be solved if I were to put together an adaptor which will adapt a buttstock, have a hole for a rear takedown plus have the desired pistol grip to boot. The adaptor is easy ... now what do I adapt this thing to? I thought ... there is a thriving industry in AR parts ... maybe I can 'steal' something from this arena no? Well ... it turns out that the AR buffer tube is a 1,185" (mil-spec) diameter. This is too big for the little 10-22 receiver! I need something smaller. I need something along the lines of 0.750" I looked everywhere. I did find that 16-tpi screw threads are quite common for 0.750" hardware. Plus, I do have a mill. I decided that I should design and make up my own 0.750" adaptor. The problem was I did not know how the Blackhawk Axiom stock was built. I needed to some exploratory machining on this thing to figure out exactly how to make the adaptor.  After doing the machining on the 1022 charger pistol stock; it became quite clear to me as to how to install a pillar and design the adapter to simultaneously attach to the pillar and to secure the back end of the receiver. Here is a pic of the machined adapter. As you can see, this thing has a peg machined into it and a hole for the rear take-down screw. 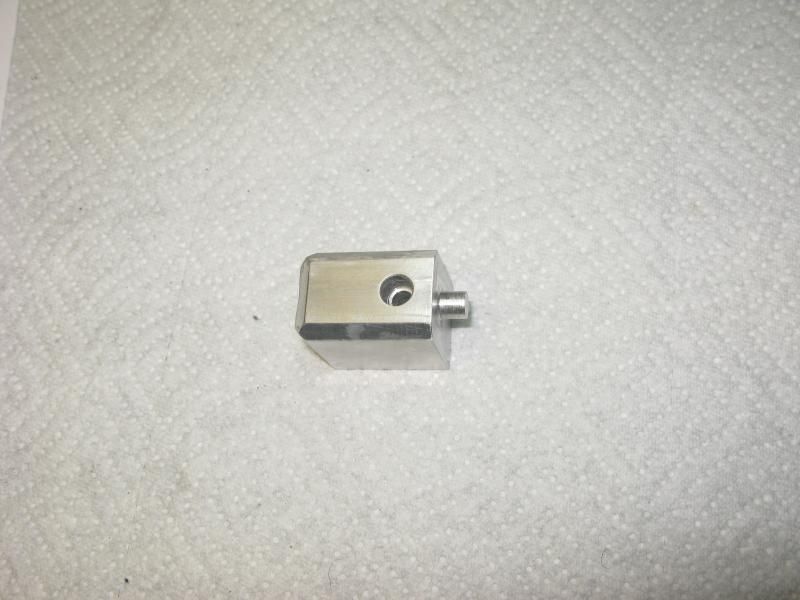 The rear end of the adaptor is threaded for a 3/4" - 16TPI insert. Here is a pic of the front accessory insert I added to the stock. This picture also shows th 3/4" - 16 TPI adaptor hardware I made up. The adaptors have a 17mm insert hole to accomodate the 16mm carbon fiber buttstock extension tube.  Here is a pic of the modified Blackhawk Axiom stock. As you can see, it is bedded. I used the Miles Gilbert bedrock kit to do this. The white area is the Miles Gilbert glassing compound. The grey area, (used to secure the pillar) is JB Weld. That JB Weld is great stuff!  Here is a pic of the underside of the modified Axiom stock. As you can see, the pillar is securely epoxied into the polymer stock. 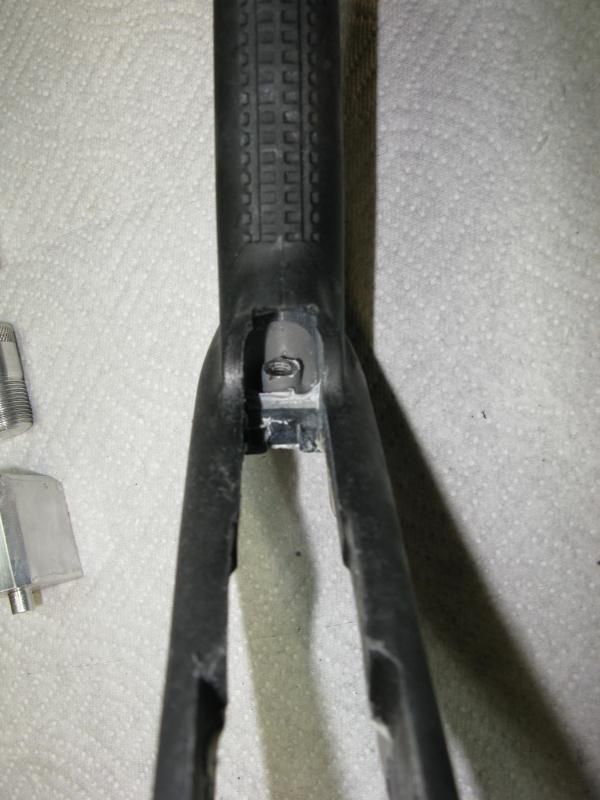 Now ... on to the buttstock / buttplate assembly. Here is the idea as to how I did the buttplate. The following diagram is a front view of the initial machined parts for the buttplate assembly. As you can see... this thing looks nothing like a buttplate. 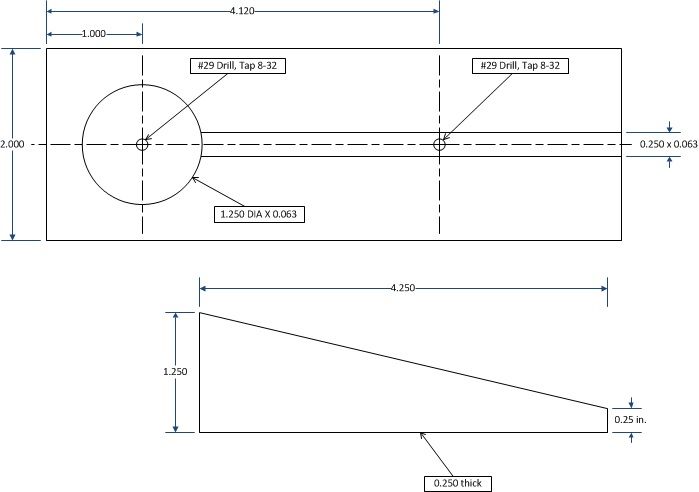 I machined this thing using 1/4" flat stock. I then used some aluminum brazing wire to solder all the pieces together to make a butt-plate. After I did all of this, I drilled and tapped some holes to attach the Pachmayr decelerator pad. I then traced the pad using a black sharpie marker and cut the excess using a dremel tool. I then fixtured a belt sander to my vise and ground the aluminum to fit the decelerator pad. I then used varying grades of sand paper and hand fitted the pad to the machined and brazed butt-plate. The following two pictures are the result of all this effort. Here, you can see the aluminum brazing and soldering on the underside of the butt-plate. The adapter on the butt-plate is 3/4" - 16TPI of course! 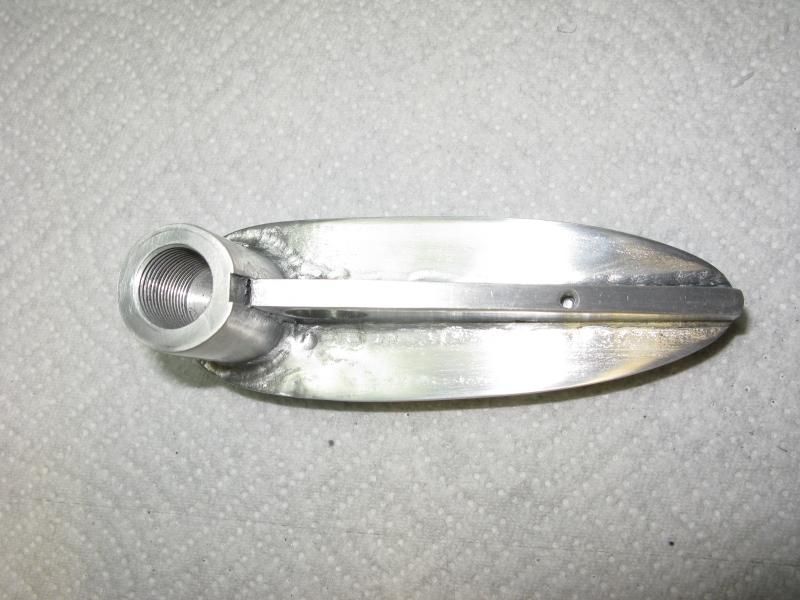 Here, you can see the finished butt-plate. I milled a hole in the web in order to place a polymer ring for a 2-point sling attachment. 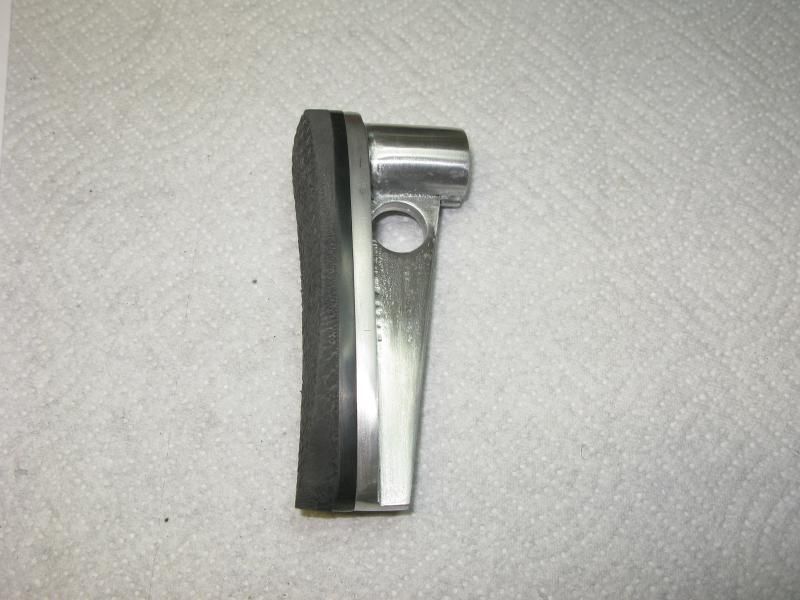 Here, you can see where I am today. This is kind of like an exploded view of the project with the actual machined parts. You can clearly see how the rear adapter serves a multi-purpose for the butt-stock adaptor, rear and front takedown and a cleaning port for the breech access of the firearm. 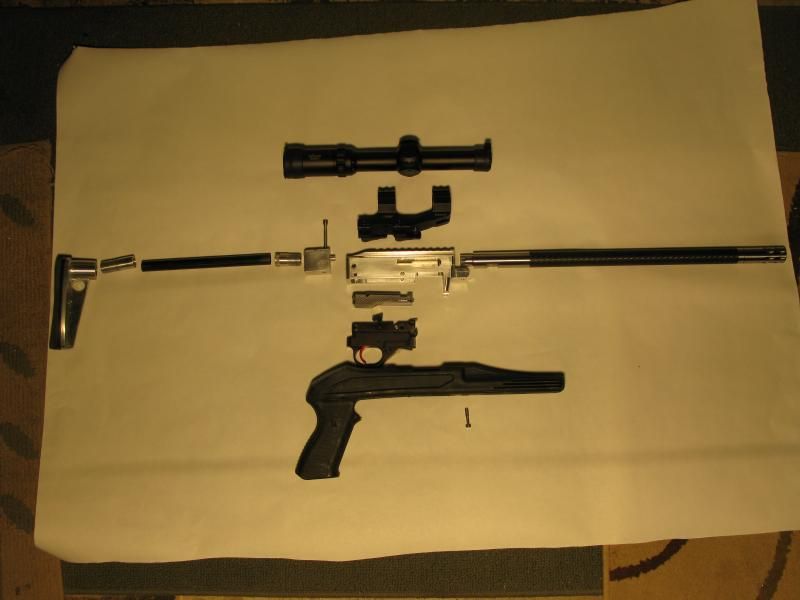 As of today; there are a few things I need left to do. 1. Add some identifying markings, (model / serial number) to this thing. I will be using an electrochemical etch to do this. 2. Clear anodize the aluminum parts, (battery acid + constant current power supply) 3. Machine the fittings for the front accessory rail 4. Duracoat the modified stock 5. Fit the optics 6. Take it out to the range! |
|
dangun
Member
I love the smell of burnt gun powder.
Posts: 517
Location: SW Florida
|
Post by dangun on Jun 19, 2014 7:09:16 GMT -5
Ken,
That is awesome. It is coming along and I bet will shoot great. Nice job with the essay.
Question is the barrel and receiver threaded or the clamp in? I can't tell by the pictures.
|
|
|
|
Post by krwada on Jun 19, 2014 8:40:10 GMT -5
Ken, That is awesome. It is coming along and I bet will shoot great. Nice job with the essay. Question is the barrel and receiver threaded or the clamp in? I can't tell by the pictures. Hello Dan; Thanks for your kind comment. The barrel and receiver are both clamp in. It uses the Ruger V-block. The Volquartsen barrel tenon is manufactured a couple of thou larger than spec. I am planning on using some dry ice on the barrel tenon and a heat gun on the receiver to cold fit the tenon into place before fitting the V-block. This should take away any wiggle or barrel droop. Most folks get some emory cloth and will hand fit a Volquartsen barrel into the receiver. I believe this is the wrong approach. I am guessing that cold fitting will bring better results when it comes to accuracy. |
|
|
|
Post by hacker54 on Jun 19, 2014 9:01:05 GMT -5
Ken,
All I can say is WOW!!!!! That is one awesome build that you have. Great job indeed!! Please update when you get the range time.
|
|
dangun
Member
I love the smell of burnt gun powder.
Posts: 517
Location: SW Florida
|
Post by dangun on Jun 19, 2014 9:41:01 GMT -5
Ken,
I agree with your method using the dry ice if the differences aren't that great. I have fitting many parts this way. Is the tenon coned or does it have a slot for the extractor? How much difference is there between the ID of the receiver and the OD on the barrel tenon?
|
|
|
|
Post by krwada on Jun 19, 2014 10:47:09 GMT -5
Ken, I agree with your method using the dry ice if the differences aren't that great. I have fitting many parts this way. Is the tenon coned or does it have a slot for the extractor? How much difference is there between the ID of the receiver and the OD on the barrel tenon? Hello Dan; The tenon has a slot for the extractor. The difference between the ID of the receiver and the OD of the barrel tenon is approximately 0.0015". That is ... the OD of the barrel tenon is 0.0015" greater than the ID of the receiver. I machined the barrel tenon hole on the receiver to exactly the dimensions per the machine drawings, (0.6875). I also did this using a boring bar. One of the problems with using a drill is that there is way too much runout with the drill chuck. Therefore, the holes that the drills make are not square. Drills are only good for making preliminary cuts, that is hogging out material. I was thinking about purchasing a reamer to do the barrel hole. However, the problem with the reamer is that you should not use a reamer to follow a drill hole. The reamer just follows whatever made the 1st cuts. In general, reamers should only be used if you make the initial hole using drill then the boring bar followed by a reamer. This is how I remember it way back 30+ years ago. I started the barrel hole using a cobalt 1/4" drill. I followed this with 3/8, 1/2, 5/8 then finally I used a boring bar to get 0.6875", (11/16). I suppose the proper way to have done this was 1/4" followed by 3/8 then 1/2 with boring bar to 5/8 and finish using a 0.6875" reamer. However ... I could not justify purchasing a $45 reamer just for this job. The boring bar is way more practical and will find many more uses in future projects. The major thing that separates me from the professional machinist is I do not have to make any money at this. If I did ... I would most certainly starve to death. Heh! |
|
|
|
Post by krwada on Jun 19, 2014 10:49:25 GMT -5
Ken, All I can say is WOW!!!!! That is one awesome build that you have. Great job indeed!! Please update when you get the range time. Thanks Gary; Yes ... I will update as follows: 1. When the build is complete ... I need to post more pics of the final assembly 2. After the 1st range trip. Hopefully, this thing will work. |
|
gws
Member
Posts: 969
Location: NW New Mexico
|
Post by gws on Jun 19, 2014 11:51:02 GMT -5
Very neat Ken....most of it went right over my head on first reading. I'll try again after work when my head can unwind. I need to buy another 1022! I gave my original to my son. (HA, I bought that thing at a grocery store for $58. That's an example of why the freedom days in America were special) Wondering about a take-down version.
Making a 1022 into a target model would take more time than I have right now......yup jealous! Do enjoy it!
|
|
|
|
Post by krwada on Jun 19, 2014 12:00:32 GMT -5
Very neat Ken....most of it went right over my head on first reading. I'll try again after work when my head can unwind. I need to buy another 1022! I gave my original to my son. (HA, I bought that thing at a grocery store for $58. That's an example of why the freedom days in America were special) Wondering about a take-down version. Making a 1022 into a target model would take more time than I have right now......yup jealous! Do enjoy it! Thanks GWS; Yes ... the old days of 1022 are long gone for now. The 1022 takedown is an exceptional rifle. It costs more, but you can do a lot more with it. |
|
dangun
Member
I love the smell of burnt gun powder.
Posts: 517
Location: SW Florida
|
Post by dangun on Jun 19, 2014 20:17:02 GMT -5
Yep I got schooled on square holes awhile back when learning to cut chambers. Anyway the reason I asked about the tenon being coned or slotted is that I have seen a couple of competition guns that the builder decided to turn a cone on the tenon. That enabled the barrel to be indexed for accuracy tuning. I know that it can help because I have an Anschutz 2013. All barrels made for the 2013 are coned or beveled if you will. When I change out the barrels it needs to be indexed depending on the velocity of the ammo used. Of course a barrel tuner is much simpler to use but in some competitions the tuner isn't allowed but there is nothing in the rules about indexing. The tenons of these barrel are coned/beveled so that the extractor will engage the rim no matter how the barrel is turned. Just curious.
|
|
|
|
Post by krwada on Jun 22, 2014 19:13:49 GMT -5
OK ... the thing is finished ... for now. Here is a pic of the final with the forward grip in the tactical position. 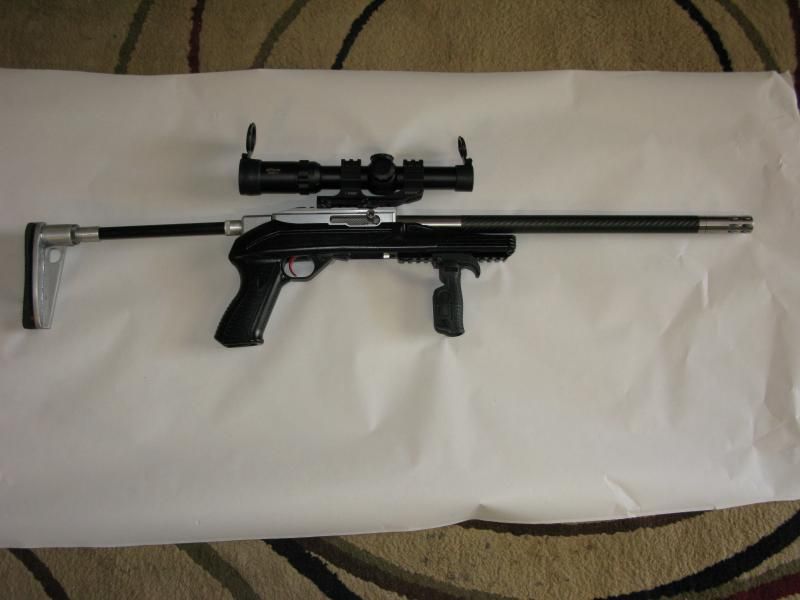 Here is a pic with the forward grip in the 'potato' configuration. This is the configuration for the longer off-hand shots. 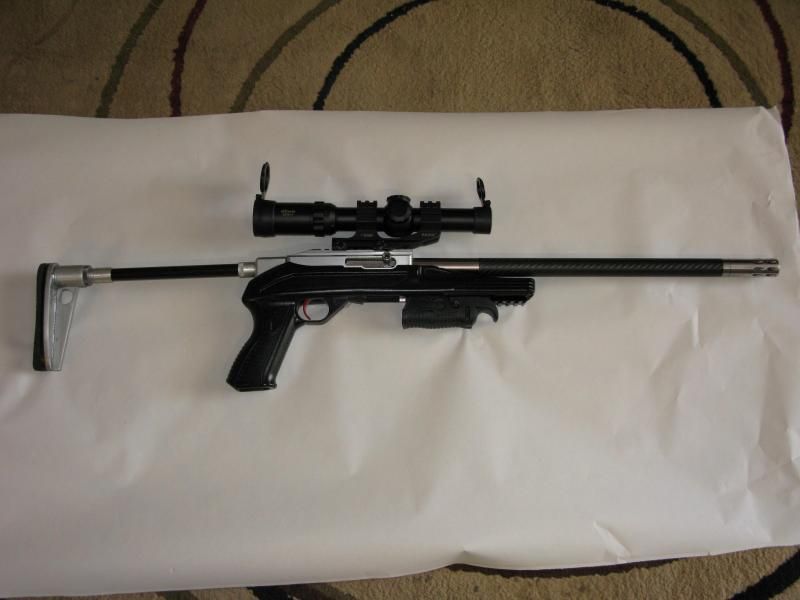 Here is a pic with the single point sling attached.  |
|
jbnut
Member
Posts: 169  Location: Warren, Pennsylvania
|
Post by jbnut on Jun 22, 2014 20:42:03 GMT -5
Wow. Just Wow Ken. Very nice piece of art work there. It makes my 10/22 Takedown look so ordinary. Great job.  |
|
|
|
Post by hacker54 on Jun 22, 2014 21:02:20 GMT -5
Ken,
SWEET!!!!! Very very nice indeed. I like the folding forward pistol grip. I need to get one for my tatical side by side.
|
|
gws
Member
Posts: 969
Location: NW New Mexico
|
Post by gws on Jun 24, 2014 10:33:53 GMT -5
Gorgeous already Ken! I have a serious case of "I want one-itis"!!! Except I also have a serious case of dumb and dumber.....I have none of the skills necessary. But I can look.....keep it coming!  |
|
dangun
Member
I love the smell of burnt gun powder.
Posts: 517
Location: SW Florida
|
Post by dangun on Jun 24, 2014 21:01:12 GMT -5
I am very impressed, how soon can you ship it to me. It will need to be tested in the Florida environment ya know. LOL
Very impressive!
|
|
|
|
Post by krwada on Jun 25, 2014 9:55:23 GMT -5
Many thanks for all the kind replies.
It is simply amazing what a little bit of duracoat can do for the aesthetics of a firearm no?
About the only concern I have is the QD PEPR scope mount. The problem with this thing is that it is not windage adjustable. This means the only way to take out the windage is through the internal scope adjustments ... which is not much. Personally, I always like using mounts which are windage adjustable. Yes, it is a royal pain to set these types of mounts up. However, the fact that the internals of the scope adjustment is very close to factory zero, (center), means the internal tube is very close to center as one can possibly get. I know this does not mean much with a low recoil system like .22LR. However, this will make a difference with the high power center fire rifle.
I will be taking this rifle to the range this weekend to see how well it shoots. If I need to ... I will place an order for some windage adjustable steel scope mounts.
|
|
|
|
Post by krwada on Jun 29, 2014 16:33:25 GMT -5
Well ... It is still not quite done. Anyhow, here is what the thing looks like with the reflex sight installed. 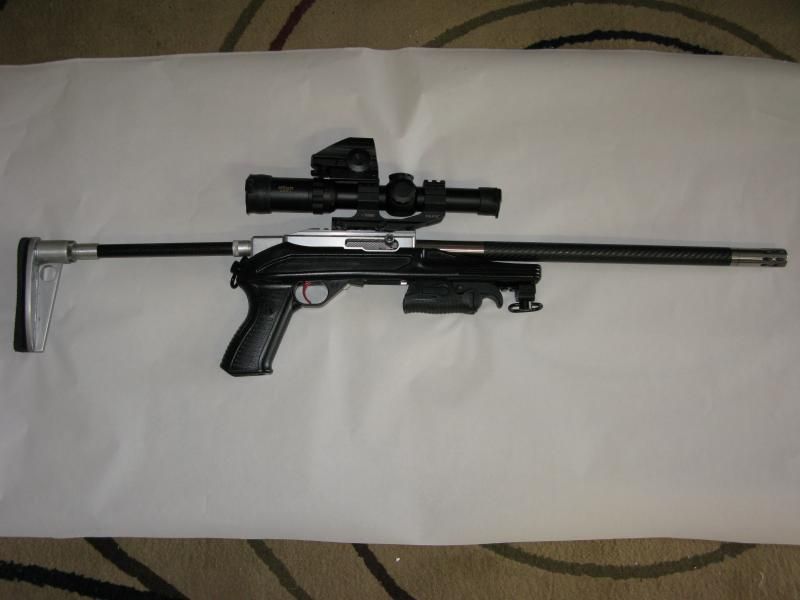 I went out to the range today to sight the thing in. Here is the final sight-in with a five(5) shot group using Aguila Super Extra HV ammo. Here is the final sight-in result:  I must say ... the accuracy with this thing ... even with a low power tactical scope is very good. I know I can do better than this with practice and if I had something better than 4x. However, having a greater than 4x would defeat the whole tactical thing no? Anyhow; as I said, I am still not quite through with this thing yet. It turns out that even though I bored the barrel hole exactly in the center of the receiver ... the chamber and bolt face do not line up properly! It looks to be almost 0.010" off! I will be talking to select fire about this ... or maybe I will just go out and purchase another blank from them. So now ... I have a finished machined receiver that really does not mate very well to the barrel. All the stuff I did on my own seems to mate perfectly... even the stock, accessory rail and all the other stuff. However, if the barrel hole does not mate with the bolt ... that is not so good. I got a lot of failures to feed ... I found out, by careful inspection using dummy action rounds that the bolt does not line up perfectly with the barrel. I double checked the barrel hole, and this sucker is machined perfectly in the center. Oh well! I am not going go give up however ... I got too much invested in this thing ... time and material! |
|
|
|
Post by krwada on Jun 30, 2014 0:06:44 GMT -5
OK ... I just talked to Phil over at Select Fire. He told me that all bolts are not created equal.
I think now I know better, and will measure and test fit everything! The engineer in me keep telling me that specifications are specifications ... Which they are not!
I know this axiom from my regular professional job. NEVER ASSUME ANYTHING.
I just ordered another blank and it should be coming in later this week.
If all goes well, I will be checking this thing out before I start machining it. There really is no standard for the 1022 ... or for any platform for that matter. This is why I chose to do this project before I head on and try bigger badder stuff.
It continues to be a learning experience for me. The fact that this thing shoots so darned well has gotten me really motivated to make another attempt!
|
|
w6br
Member
Posts: 7  Location: Windsor, CA
|
Post by w6br on Jun 30, 2014 20:00:34 GMT -5
Wow Ken, what a great job - I'm proud of you!! :-)
Question why the butt plate pad, isn't that a .22 cal Rifle?? :-)
Take and congratulations,
Ron
|
|
|
|
Post by krwada on Jun 30, 2014 21:20:26 GMT -5
Wow Ken, what a great job - I'm proud of you!! :-) Question why the butt plate pad, isn't that a .22 cal Rifle?? :-) Take and congratulations, Ron Hello Ron; Yes ... the thing is total overkill. I wanted the butt plate pad for the coolness look factor. I figured that the 1022 would be easier to build. Thus, I chose this platform as my first project. Hoo boy .... Was I wrong on that one! I am finding that maybe the scratch-built AR starting with an AR blank is probably easier to build than this thing. There has been a lot of hand fitting to get everything to work ... And I am still not done! I just ordered another 1022 blank from Select Fire and it was shipped to me today. With the new knowledge I have in hand ... I think I can get this to work. I had not anticipated that I needed to custom machine the blank to fit the Kidd bolt. I have learned a whole ton with this build. |
|
loafer
Member
No Loafing around
Posts: 52
|
Post by loafer on Oct 18, 2014 9:39:03 GMT -5
Very nice Ken you have great talent,Your wife is right you have a calling & something that makes you happy & content
|
|
bob
Member
I'm too old to be nice but never too old to learn!
Posts: 1,457  Location: Northern California
|
Post by bob on Oct 18, 2014 10:15:33 GMT -5
Ken, this is the first time I've followed your project, very well done!!
|
|